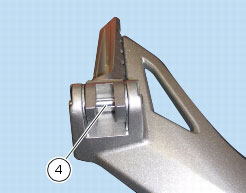
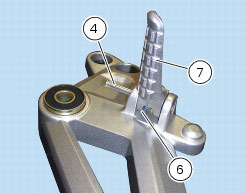
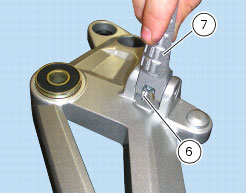
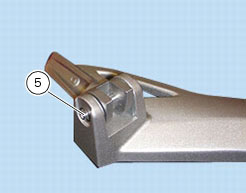
4 -
1
2
3
4
5
6
7
8
9
10
11
12
13
14
15
16
17
18
19
20
 Spare parts catalogue
Important
Bold reference numbers in this section identify parts not shown in the figures alongside the text, but which can be found in the exploded view diagram.
Removal of the footrest brackets
The following removal operations apply to both left and right footrests.
To remove the right-hand footrest, unscrew the screws (A) while holding the nut (B) and remove the rear brake fluid reservoir (C).
Before removing the left footrest bracket, unscrew the screw (D) securing the gearchange lever to the engine, but leave the gearchange assembly attached to the bracket.
Unscrew the upper two screws (3) securing the bracket to the swingarm.
Recover the washers (17) located between the bracket and the frame.
Unscrew the lower screws (11) and (18) securing the LH footrest bracket (15) to the crankcase, recovering the two washers (2).
Remove the brake master cylinder (E) by unscrewing the two screws (F): slide the master cylinder (E) off the pushrod (G).
Disconnect the rear brake sensor (H) from the main wiring harness.
Remove the RH footrest bracket assembly (8).
To separate the rear RH footrest (13) from the footrest bracket (8), remove the circlip (5) and drive out the pin (4) to release the footrest (13), the plates (10), the ball (9) and the spring (12).
 
To separate the front RH footrest (7) from the bracket (8), remove the circlip (5) and drive out the pin (4) to release the footrest (7) and the spring (6).
 
The procedure is the same for the LH footrest.
Note
The footrest may also be removed with the footrest bracket installed on the motorcycle.
Refitting the footrest brackets
The refitting operations described below apply to both footrest brackets.
To reassemble the front RH footrest (7), locate the spring (6) between the footrest lugs and attach it to the footrest bracket, in­serting the straight end of the spring in the hole in the bracket.
Position the front footrest (7) in its seat.
Grease the pin (4) and insert it from the top, securing it on the other side with the circlip (5).
Locate the spring (12), the plates (10), the ball (9) and RH rear footrest (13) between the lugs on the RH footrest bracket (8).
Note
Drilled plate (10) shall be installed with hole countersink (L) facing the rear footrest.
 
Grease the pin (4) and insert it from the top, securing it on the other side with the circlip (5).
Check the condition of the rubber bushes (1) installed on the footrest bracket.
If they need to be renewed, orientate them as shown in the figure.
Smear the seats (N) of screws (11) and (18) with lubricant.
Locate them in correspondence with the threaded holes in the frame and the crankcase.
Important
When refitting the LH footrest bracket (15), position the washers (2) in correspondence with the fixings on the engine crankcase.
Refit brake master cylinder (E) and tighten the screws (F) to the specified torque (Sect. C 3, Frame torque settings). Position the rear brake sensor (H) of main wiring harness onto plate (8) with copper washer (M) in-between.
Insert the rear brake pushrod (G) in the rear brake master cylinder (E).
Fix the footrest brackets (8) and (15) to the swingarm with the screws (3), suitably lubricated, with the washers (17), and to the engine with screws (11) and (18). Tighten the screws (3), (11) and (18) to the specified tightening torque (Sect. C 3, Frame torque settings), following the indicated sequence.
Fix the gearchange control unit to the crankcase, applying threadlocker to the screw (D) and tightening it to the specified torque (Sect. C 3, Frame torque settings).
Refit rear brake reservoir (C) and tighten the screw (A) to the specified torque (Sect. C 3, Frame torque settings).
 
H